|
Mordanšage
© 2010 by Christina Z. Anderson. All rights reserved.
|
Excerpted from the Experimental Photography Workbook,
available from Freestyle.
|
|
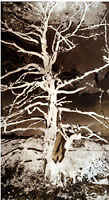 MORDANăAGE IS A FASCINATING, ARCANE PROCESS dating from the late
1800’s, and rarely found in textbooks today. Because it has such possibilities for expression in our postmodern art world, I’ve been searching through out-of-print
photography books and patents from as early as 1898 to find out more about its chemical workings. MORDANăAGE IS A FASCINATING, ARCANE PROCESS dating from the late
1800’s, and rarely found in textbooks today. Because it has such possibilities for expression in our postmodern art world, I’ve been searching through out-of-print
photography books and patents from as early as 1898 to find out more about its chemical workings.
It was called by different names when it was first discovered: bleach-etch, etch-bleach, gelatin relief, and reverse relief are some of the terms used. The process
was originally designed to be used on film and not paper. It was a method of reversing a film negative to a positive. Originally discovered by Liesegang in 1897, a man by the
name of Andresen improved upon Liesegang’s formula in 1898 by substituting hydrogen peroxide for the ammonium persulfate Liesegang used, and that is the formula we use today. Then Jean
-Pierre Sudre coined the term ‘mordanšage’ and turned it into an art form using prints.
What happens to the print in the mordanšage process? An acid-copper bleaching solution is used to bleach and dissolve away parts of the silver image. It leaves the print in a reverse relief. The
dissolving occurs proportionately to the darks—the darker the area, the more dissolution. With a little rubbing, the solubilized metallic silver gelatin layer lifts off of the print and leaves behind
whites in reverse relief where the darks once were. Then with redevelopment, toning, or dyeing, the image reappears as part positive and part negative, or all negative.
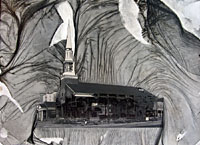
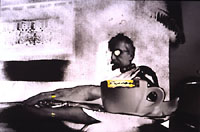 Rubbing completely, barely, or not at all, are your choices. Complete rubbing produces a reversed or more negative image, but more often
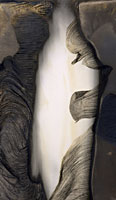
than not, some positive remains because the original highlights in the print usually don’t dissolve. If there are large areas of darks in the print (e.g. a black background), with strong enough peroxide these areas
become wavy, like veils. If you are careful with your rubbing and washing, these veils can remain attached, albeit tenuously, to the points of contrast between the
more anchored highlights and the detached shadow areas. Upon drying, the gelatin veils will re-adhere to the print surface and stay put. Rubbing completely, barely, or not at all, are your choices. Complete rubbing produces a reversed or more negative image, but more often
than not, some positive remains because the original highlights in the print usually don’t dissolve. If there are large areas of darks in the print (e.g. a black background), with strong enough peroxide these areas
become wavy, like veils. If you are careful with your rubbing and washing, these veils can remain attached, albeit tenuously, to the points of contrast between the
more anchored highlights and the detached shadow areas. Upon drying, the gelatin veils will re-adhere to the print surface and stay put.
You can use the process on previously finished prints or fresh prints that you have just developed. In fact, you can mordanšage a print right after developing and before fixing.
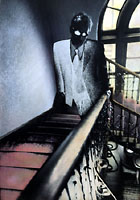
The best images for this process are ones with rich blacks, such as dark backgrounds, or intricately detailed patterns like black lace or wrought ironwork.
 If you can put up with the odor and don’t mind purchasing a few extra chemicals (copper chloride, glacial acetic acid, and hydrogen peroxide), it is a must-try.
Adopt the attitude of accepting what comes, because it is imperfect, messy, unpredictable at times, frustrating at others, and finally serendipitous. If you can put up with the odor and don’t mind purchasing a few extra chemicals (copper chloride, glacial acetic acid, and hydrogen peroxide), it is a must-try.
Adopt the attitude of accepting what comes, because it is imperfect, messy, unpredictable at times, frustrating at others, and finally serendipitous.
Caution: Use this process at your own risk and do not breathe the fumes! This process requires excellent darkroom ventilation. If you do not have this, do
the process outside! Always protect your eyes from splashing. Wear old clothes or an apron, because the solution will discolor and eat through fabric.
Wearing gloves is an absolute must. Latex gloves are permeable to chemicals, so nitrile gloves are your best choice. Remember: AAATW—always add acid to water, never water to acid!
|
Mordanšage Formula
|
|
Solution A
|
|
Water
|
750 ml
|
|
Copper chloride
|
10-30 g (1-2 tablespoons)
|
|
Glacial acetic acid
|
80-110 ml
|
|
Water to make
|
1000 ml
|
|
Solution B
|
|
Hydrogen peroxide 10-20 vol.
|
(buy at beauty supply store)
|
|
Add copper chloride slowly to 750 ml water and stir. Add acetic acid slowly and stir. Add water to make 1000 ml. This part of the solution lasts indefinitely. Label the bottle Solution A and Poison.
At time of use, mix solution A and B together in equal parts to produce the amount of working solution you need. 500 ml of combined solution in a tray will do quite a few prints. Once A is
mixed with B, it has a shelf life. It is possible to use it for up to several days, or even bottle it and at a later date add some strong hydrogen peroxide (20-40v) to reactivate, so try this
before wasting chemistry.
|
|
THE PROCESS (ALWAYS WEAR GLOVES!!)
Tip: Set up trays in this order, from left to right: mordanšage solution tray, water tray for rinsing, developer tray, water tray for rinsing.
- Bleach a wet or dry print in the mordanšage solution for twice as long as it takes to fully bleach. This can take from 30 seconds to 15 minutes, depending on your print, paper, and
strength of hydrogen peroxide and copper chloride. The more hydrogen peroxide, the greater dissolution. The more copper chloride, the faster the bleaching. Ilford MGIV Glossy Fiber
is ready in seconds to a minute or two. Nudge a dark area of the print to see if it is lifting off and bubbly.
- Rinse well, especially with fiber paper.
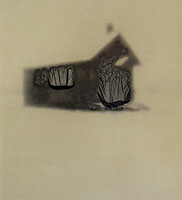 Rub off the disintegrating emulsion with your gloved fingertips, cotton balls, or even the plastic scouring side of a sponge if it is not
being cooperative—be careful or you may rub all the emulsion off and make scratch marks. Or, don’t rub and leave the veils attached. You can do your rubbing under water (put the print on a piece of
plexi or use a flat bottomed tray), under hot water with a stubborn print, or out of the water. It depends on how fragile the emulsion is. Be prepared to have a mess on hand. The emulsion will lift off the
base and leave bits of stuff floating in your trays, that sticks to everything when it dries. Rub off the disintegrating emulsion with your gloved fingertips, cotton balls, or even the plastic scouring side of a sponge if it is not
being cooperative—be careful or you may rub all the emulsion off and make scratch marks. Or, don’t rub and leave the veils attached. You can do your rubbing under water (put the print on a piece of
plexi or use a flat bottomed tray), under hot water with a stubborn print, or out of the water. It depends on how fragile the emulsion is. Be prepared to have a mess on hand. The emulsion will lift off the
base and leave bits of stuff floating in your trays, that sticks to everything when it dries.- Redevelop the print in any of the following: Dektol normal strength or up to a 1:5 dilution, sepia toner, thiocarbamide toner, etc. Or, expose the print to light for 60 seconds until the
image is complete, and redevelop in selenium toner at a dilution of 1:4. You will get pale magenta tones, but remember that selenium has fixer in it and hence it is not a redeveloping
toner where the image comes in more fully. What isn’t there will not be there.
- Remove, rinse carefully and fully, and inspect. If it is perfect, then rinse a good 15 minutes if possible. If you want to keep veils attached on the print you will not be able to rinse the print
adequately. I have had prints for years that have not degraded, but let’s face it—the chemicals used in the mordanšage process are not increasing the prints archivalness. If it is
perfectly placed and unrinsed, put it on newsprint and let dry. If it needs more lifting, you can repeat the bleach-etch bath and redevelopment again. Sometimes the gelatin may not budge
until it hits the developer for the first—or second—time. I have never needed to redevelop more than twice, and rarely redevelop twice.
 Wash. If you have veils that you want to remain attached, the print will be difficult to wash well. I recommend a separate tray for a
finished print to soak in plain water; carefully change the water a number of times over the course of an hour. Wash. If you have veils that you want to remain attached, the print will be difficult to wash well. I recommend a separate tray for a
finished print to soak in plain water; carefully change the water a number of times over the course of an hour. - Dry. Don’t use your normal drying cabinet for this because you will contaminate the screens.
- Once dry, flatten in a dry mount press between two pieces of mat board that are dedicated to mordanšage to again prevent contamination of other prints.
TIPS
All brands of papers work, but the easiest is Ilford MGIV Glossy.
RC paper has some advantages in this process, if you can put up with its inherently unpleasing plastic quality. It rinses quickly between steps, and remains more impervious to the chemicals, so
it doesn’t have the yellowing problem that fiber paper sometimes does. But it is more difficult to preserve the veils on RC.
Fiber paper often turns yellow or red brown in the highlights and borders of the print, which can be quite beautiful. Some do not like this antique look. It can be minimized by the following five
practices. They are listed in order of importance from most common cause to least:
 Rinse the mordanšage solution off very well before redevelopment to prevent chemical stain resulting from contamination between copper
bleach and developer. Rinse the mordanšage solution off very well before redevelopment to prevent chemical stain resulting from contamination between copper
bleach and developer.- Reduce the copper chloride in the solution to a lower amount.
- Use the lesser strength hydrogen peroxide—10 or 20 volume.
- Fix after you have mordanšaged, redeveloped, and rinsed your print thoroughly, but be prepared for sulfurous smells and only do so outside or with a vent hood.
- Mordanšage under safelight, not room light, even with a previously fixed print, again, in a darkroom with excellent ventilation.
If you find your mordanšage is not dissolving as it should, there are a number of causes that you may address:
- Make sure your hydrogen peroxide has not exhausted.
- Use a stronger volume of hydrogen peroxide.
- The acidity of the solution needs to be between 2.6 and 3.0 (Speck, Patent #2,494,068), so add a ml or two more of glacial acetic acid as needed.
- Give the print more time in the solution.
-
Dry your print first. A dry print will accept the chemicals fully as it soaks, unlike a wet print that is already soaked through.
- Heat the print in a dry mount press before using it in the process.
- Be sure your print has not been previously toned.
Acrylic spray: A final coat of Krylon Crystal Clear non-yellowing acrylic spray will protect a completely dry mordanšage. This layer of acrylic will not only protect the surface and add a gloss
, but also arrest some of the deterioration a mordanšaged print will succumb to over time by reducing the amount of air that gets to the surface of the print. It also evens out the gloss of the
print where the etched areas have lost their shine.
Digital copies: Scan the print when complete because it will print beautifully on digital paper. Do not expect a mordanšage to last perfectly and forever, as the print has succumbed to a heavy
chemical beating.
|
Sources
- Clerc, L. P. Photography, Theory and Practice, Vol. 4 on Monochrome Processing and Vol. 5, Positive Materials.
NY: Amphoto Focal Press, 1971. Vol. 4, pp. 578-580, #678; Vol. 5, pp. 660-675).
- Coote, Jack. Ilford Monochrome Darkroom Practice. Great Britain: Focal Press, 2000, pp. 299-304.
- Glafkides, Pierre. Photographic Chemistry, Vol. 2. London: Fountain Press, 1960 (pp. 668-669).
- Greenleaf, Allen. Chemistry for Photographers. Boston: American Photographic Publishing Col, 1941
(pp. 96-97).
- Henney, Keith and Bev Dudley. Handbook of Photography. New York: Whittlesey, 1939 (pp. 653, 463-465).
- Hicks, Roger and Frances Schultz. Darkroom Basics and Beyond. London: Collin and Brown, Ltd, 2000, pp.
116-118.
- James, Christopher. The Book of Alternative Photographic Processes. Albany: Delmar, 2002, pp. 314-317.
- Liesegang, Paul. Die Collodion Verfahren mit Jod und Bromsalzen. Leipzig, 1898.
- Marriage, A. "Notes on Etch Bleach Baths" in British Journal of Photography, April 21, 1944, p. 142.
- Neblette, C.B. Handbook of Photography and Reprography, 7th Edition. New York: Van Nostrand Reinhold, 1977 (p. 124).
- Schultz, Frances. Shutterbug magazine, in an article entitled "Bleach Etch: Alternative Process for Striking Images", October 1998, pp. 30-36.
- Wall, E. J. Practical Colour Photography, 2nd edition. Boston: American Photographic Publishing Co.,
1928, pp. 90-94.
|
|
|
|


